Tuesday, April 27, 2010

No till potatoes

This past weekend we planted potatoes, all 40lbs of Banana Fingerling, Adirondack Red, Red Gold and All Blue. Thanks to my parents who came to help out to make easy work of these no-till potatoes. Conventionally, potatoes are planted into a furrow 3-4" deep in freshly cultivated soil. As the plants germinate and grow, the soil is hilled around the base of the plant. Hilling allows the growing tubers to remain in moist, dark conditions that increase yield and prevent"greening". Preparing soil for potatoes not only is time consuming but also disturbs soil structures and exposes weed seeds in the lower layers of the soil to the light they need for germination. In northern climates, especially, Spring is characteristically wet and cold, which can prevent timely preparation of these potato beds. There is also little time for Spring growth of cover crops needed for soil fertility and weed suppression.
One way to work with the land, and not against it, is to plant no-till potatoes. I planted a dense cover crop of rye, vetch and crimson clover in the late summer with enough time for it to establish. However, the real growth didn't come on until the early Spring . To prepare for planting, I mowed down the cover crop which resulted in a nice surface mulch to retain soil moisture and suppress weeds. The potatoes pieces were then laid out on the surface and covered with about 6"-12" of straw. That's it! As the potato plants grow, I will mulch with straw 2-3 more times until there is a dense cover of straw protecting the future potato crop.

After harvest, I should have a weed free bed ready to plant a late cover crop or even the fall garlic. There will still be decomposing straw cover, which would benefit the garlic planting very well.

Tuesday, April 13, 2010

Compost

Farmers love this stuff.
Everyone should love this stuff. Mix it with your house plants, load it into your garden, spread it on your lawns...better yet turn that lawn into a garden and add compost.

I got a load of compost delivered today from Toad Hollow Farm, which is right down the road from my farm site. It is dark, rich, and moist...and has a great smell to it. Compost not only adds organic matter and nutrients to a soil, but it can break up clay soils and improve water holding properties to sandy soil by improving a soil's tilth. It also feeds the microorganisms that live in our soil and without them the soil would be dead.

I will be mixing the compost into the beds this week one wheel barrel at a time. I would have preferred to spread it before tilling, but I needed to till when the ground was dry enough after a rain but not hardened from too dry weather. I had a pretty small window when I thought the conditions would be right, and I did not have time to get the compost.

I hope to be able to generate enough compost on my farm one day, that I will not have to rely on off site fertility. It is important to close the circle of nutrient transfer. While I know there are some things that the soil and farm will need that it cannot produce, composted manure or composted garden/food waste is one way of returning nutrients to the very soil they came from.

Sunday, April 4, 2010

Till and no-till

With the unseasonably hot (and windy) weather we have been experiencing, I was able to till a few of the garden beds by hand this week. I planted some late summer/fall cover crops on these beds and want to turn this growth into the soil for added organic matter. Hand tilling usually starts with this "beast" the broadfork:

The curved tines allow an easy rocking motion to aerate and loosen compacted soil. It's great for spaces that will be grown intensively, as it does not disturb the soil layers and structures, and allows earthworms and microbes to do their job in the soil. Although heavy, the tiling motion is effortless.

Hand tilling can be fun, and quite a workout, but I am always interested in learning ways to "no-till" my garden beds. You can find a number of experiments for no-till but one of the most interesting approaches is using the daikon radish or more appropriately dubbed the "tillage" radish . I first experimented with these radishes on a project with Charlie White, a student of Dr. Ray Weil, at the University of Maryland. Dr. Weil has been working with a team of researchers and farmers to study the benefits of the tillage radish since 2001. The objective of their project was to study weed suppression during and after tillage radish cover crops were grown. However, the results of their study proved more beneficial.

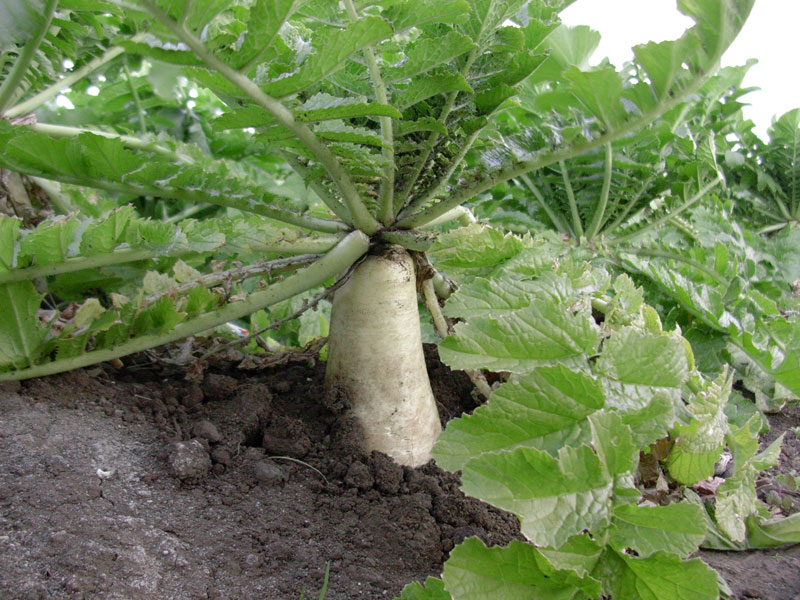
Here's how it works: tillage radishes, planted in the fall as a cover crop, have been shown to benefit soil fertility, reduce soil compaction, and limit weed growth. The radishes grow a very long taproot, up to 2" diameter and 18" long! This long root drills holes in the soil and opens up spaces for plant roots, oxygen, and earthworms to move freely. The radish, then fully mature by winter, dies off from the frost leaving its leafy green matter as a residue on the soil surface. This mulch not only add nutrients to the soil, but also protects the soil surface from erosion during the winter and suppresses early Spring weeds. Studies show the radish cover crop can capture 150-200lbs of nitrogen per acre, and make it available in Spring for the first planting of early crops.

Another benefit I have found of the radish cover crop is the soft soil it leaves behind in the Spring. Raking back the decomposed leaf matter, I found soil that was loose, aerated, and ready to be seeded or transplanted right into. No need to till by hand or large, soil compacting tractors. I love the idea of preparing the fine seedbeds with plants instead of steel. Plus, a few "stolen" radishes make a delicious fall snack!